How to Dockerize an ASP.NET Core Application with Azure Pipelines
Building a docker image with a ASP.NET core application inside it can be reasonably tricky, but don’t worry. We’ll do it together.
This entire post is written with an application using .NET Core 3.0
What we’re interested in is:
- Building our application, and being able to run it in a Docker container.
- Being able to build the docker image, both locally and on Azure Pipelines
- Being able to push the container to a docker registry, like Azure Container Registry (ACR)
Doing it locally
The local build procedure
Let’s first look at the procedure for building the project locally. We want to build the application, and then copy the resulting output into the docker container, which then runs it.
We build the project with the command:
dotnet publish -c=Release -o=build
This will publish our project into a folder with the path: ./build/
We’ll need to get this directory into our container.
The dockerfile
We need a dockerfile that specifies how our service should look. Luckily it’s reasonably simple. Microsoft maintains public .NET images we can base our own image off.
Our docker file (with explanations) looks like this.
# Start with the ASP.NET core runtime image. This bundles all the dependencies
# that will allow us to bundle our code
FROM mcr.microsoft.com/dotnet/core/aspnet:3.0

# This will take the artifacts from the publish step (dotnet publish -c Release)
# from before, and copy it into the root folder of this docker container. This means
# we now have everything we need to run the image
COPY ["./build", "."]

# As we're running a web-server
# we'd like docker to listen for traffic on port 80 (for http) and port 443 (for https)
EXPOSE 80
EXPOSE 443

# Set the correct entrypoint, which is the dll generated by publish.
# This means that when the container starts, dotnet will start with this .dll
ENTRYPOINT ["dotnet", "YourProjectName.dll"]
This file should be called Dockerfile and reside in the root of the project.
For more info, the Dockerfile reference is really good.
Bringing it together
Now we’re able to build our application locally, and put it in a docker image. We should be able to test that it works by running the docker container. If we had a bash script that tested this functionality, it would look something like this:
name="yourProjectName"

# Build the C# Project
dotnet publish -c=Release -o=build
# Build the docker image from the Dockerfile we just created.
# And name it "yourProjectName"
docker build . -t ${name}
# Delete old container if running, so we don't have duplicates
docker rm ${name}

# Run the docker image.
# The "-p 5001:80" command means that docker will map port 5001
# on your machine, to port 80 on the container. This means you should
# be able to access your service on port 5001 on your machine
docker run --name ${name} -p 5001:80 ${name}
This script when run, should build your C# project, copy it into a docker image, and run that image in a container.
Doing it in Azure Pipelines
Now let’s try to look at how we can mimic this build procedure in Azure Pipelines.
We’ll create a new YAML-based pipeline. The Azure Pipeline YAML format can be pretty confusing, but this reference is pretty good.
We’ll create a pipeline, which will run tests on all commits, but only push to the container registry, when it’s building the master branch.
Note that before this pipeline will work, you will need to set up a service connection to your Azure Container Registry. You can see how to do that here. If you do not have an Azure Container Registry yet, here is a guide on how to create one.
# Trigger this pipeline on all branches
trigger:
batch: true
branches:
include:
- "*"
# Run on the latest ubuntu instance
# Depending on the machines you're running, you might want to
# switch this to another value, like 'windows-latest'
pool:
vmImage: 'ubuntu-latest'
variables:
# This turns off the .NET telemetry. You can remove it if you're
# okay with the .NET SDK sending telemetry data back to windows.
DOTNET_CLI_TELEMETRY_OPTOUT: 1
# This is the name of the service connection to the container registry
# you defined earlier.
CONTAINER_REGISTRY_STRING: YOUR_REGISTRY_STRING
# This string is the repository name you want your image to have
# you can specify any name, and it will be created in the registry.
CONTAINER_REPOSITORY_STRING: YOUR_REPOSITORY_NAME
stages:
# This stage runs the "dotnet test" command
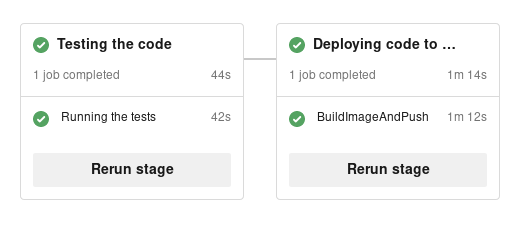
- stage: Testing
displayName: Testing the code
jobs:
- job: RunTests
displayName: "Running the tests"
steps:
- task: DotNetCoreCLI@2
displayName: ".NET Tests"
inputs:
command: "test"
# This stage builds the docker image, and publishes it to
# Azure Container Registry
- stage: Deploying
displayName: "Deploying code to production"
# This only runs the task if we're on the master branch, and we've succeeded so far
condition: and(succeeded(), eq(variables['Build.SourceBranch'], 'refs/heads/master'))
jobs:
- job: BuildImageAndPush
steps:
- task: DotNetCoreCLI@2
displayName: "Publish"
inputs:
command: "publish"
zipAfterPublish: false
arguments: -c=Release o=build
- task: Docker@2
displayName: Build docker image
inputs:
command: buildAndPush
containerRegistry: $(CONTAINER_REGISTRY_STRING)
repository: $(CONTAINER_REPOSITORY_STRING)
tags: |
$(Build.BuildId)
latest
Now we have a pipeline that runs tests on all commits, and on the master build, it pushes our docker image to a container registry of our choice.
 Hooray!
What you decide to do with the image at this point is up to you, but Azure Web App for Containers is a good bet, featuring things like automatically re-deploying when your latest docker image changes.
Did you enjoy this post? Please share it!
I'm Gustav (Mastodon), I'm currently a Staff Engineer at Climatiq, where we provide an API for all sorts of carbon emission accounting. I currently work mostly with Rust, but I've worked extensively with C#, Node, React, React Native, Typescript and Django.
All content on this website is written by a human. See the AI policy.
See an error? Submit a Pull Request and help fix it!
Back to the front page?